HP Desktop PCs - Display or Monitor is Blank (Black) after Starting the Computer
A display is connected to the computer but does not display anything. Use the steps in this document to resolve this issue or to determine if the display is defective.
This document is describes how to troubleshoot a video connection from a display (or a TV being used as a display) to a personal computer. If you have a computer with a built-in display, such as an HP or Compaq All-in-One PC or HP TouchSmart PC, see Screen is Blank after Starting the Computer.
This document helps you determine if the blank or black screen is being caused by the computer hardware, the video signal to the display, or the display itself.
NOTE:
This document does not address issues encountered using HDMI cables and displays. For troubleshooting information for HDMI, seeTroubleshooting HDMI Display and Sound Issues.
Before you begin
Do the following things to prepare for troubleshooting:
- Turn off the computer.
- Disconnect all connected devices from the computer except the mouse, and keyboard. This includes removing web cameras, USB devices, thumb drives, camera-type memory cards, and other displays.
- If the display has a detachable cable, obtain a second display cable for testing purposes.
- Disconnect the display power cable, wait about 30 seconds, reconnect the cable and then turn on the display. This resets the electronics on the display. Make sure the display has power and the power light comes on when the power button is pressed. If the light on the display remains off, the display is not receiving power from either the wall outlet or the power adapter.
Check the power
Disconnect the video cable from the display and make sure the display power cable is plugged into a power outlet.
With the display plugged in, press the power button on the display. There is a power indicator light located on the display case. What happens to the light?
- If the power light comes on, the display has power, skip to Listen to the computer and look at the lights.
- If power light remains off when you press the power button, either the display is not receiving power or the display is defective. Check all of the following items before attempting to service or replace the display:
- Make sure the power outlet has power and the power outlet matches the power rating for the display.
- Connect the display to a different power outlet.
- Try a different power cord.
If the light comes on, the display has power. Continue to the next section.
Listen to the computer and look at the lights
To help determine if the problem is caused by the computer, turn on the computer and listen to it. Look at the computer's lights. What do you notice?
- If the computer is make a beeping sound when turned on, a card, cable, memory module, or processor inside the computer might be loose. Go to Reseat loose internal components to check for loose components.
- Do you hear the computer's fan spinning? If you do not hear noise from the fans and the power light on the computer are not on, the problem is related to the computer, not the display. To continue troubleshooting a computer that does not start, refer to HP Guided Solution - No Power or No Boot Troubleshooting.
- If you can hear the computer's fan spin and see lights on the computer, the problem is probably caused by the video cable connection or the display. Continue to the next section.
Reset the display
At first setup, or under certain signal conditions, the display might not be able to switch to a new display resolution. Do not shut down or restart the computer. Instead, perform the following steps:
You should see the image from the computer on the screen. If not, continue with the troubleshooting.
On-screen message shows on the display
Use the following steps to see if a built-in on-screen message is displayed.
- Connect the video cable and turn on the computer.
- Turn on the display and wait about ten seconds while the computer starts.
- While the computer is starting, disconnect the video cable. What happens?
- If a message is displayed, the display panel is working and the problem is related to the video signal. For further troubleshooting steps, see HP support document, Flat Panel Monitor Displays Message about No Signal, Signal out of Range, Sleep, or Power Save.
- If the display remains blank, turn off the computer and continue troubleshooting.
- Some displays do not have on-screen messages but instead use the lights to indicate no signal. When you disconnect the cable, instead of an on-screen message, the light turns amber, indicating that the display lost signal and is working properly, but is out of range, or not receiving the signal.
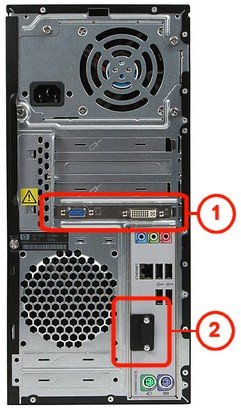
Inspect the video cable and video connectors for damage


Inspect the video cable and video connectors for damage. Check for sharp bends or breaks in the cable, or bent or broken pins at the connectors. Look for debris, dirt, crud, or other obstructions and clean the connections if needed.
Common connections used currently are DisplayPort and DVI.
Common connections used currently are DisplayPort and DVI.
Reconnect the display, making sure that the video cable is firmly connected and then turn on the computer and display. If the display is still blank, continue to the next section.
Do not remove the video port cover
If your computer came with a graphics card, HP may have installed a plastic cover over the video port attached to the motherboard. This is because video has been set up to go through the graphics card for better performance. Most PCs can use graphics from the video card or the motherboard, but not both at the same time. If you remove the plastic cover to connect a display (VGA or HDMI), the video will not work unless the video card is removed. The better solution is to connect an adapter to make the connection.
- Video card with 1 VGA port and 1 DVI port
- Covered VGA port - should not be used
Check cable connections
If you see the initial HP or Compaq logo screen but later lose the picture, go to Connect the computer to another display.
Otherwise, check the video cable connection on the back of the computer and on the display. Make sure that it is connected properly and the connecting screws are tight. Turn the display off and then back on again (while the computer is on) to see if an image gets displayed.
Ensure that you have the display power adapter cord plugged into the power connector.
After you have reconnected the power cord, turn on the display (while the computer is on) to see if an image is displayed. If there is still no image, continue to the next section.
Connect the computer to another display
Connect another display to the computer to determine which device has the problem (the display or the computer). If you do not have an extra display, temporarily connect the computer to a friend's display for troubleshooting purposes.
After the display is connected, turn on the computer and the display. What happens?
- If the newly attached display does not display anything, disconnect the cable and refer to the support document HP Guided Solution - No Power or No Boot Troubleshooting.
- If the newly attached display shows the first startup screen(s) but then goes blank or black, there is a problem with Windows starting. See support document: HP Guided Solution - No Power or No Boot Troubleshooting
- If the new display works, the original display or its cables might be faulty. Complete the following instructions with the original, faulty display.
- Check the power light indicator.
- If it is amber, the display has adequate power, but is not receiving a display / video signal.
- If it is white or blue, the display is powering and receiving a display signal, but might indicate another problem with the display panel.
- If it is not amber, white, or blue, continue to the next step.
- Replace the display power cable.
- Turn on the display. If the display shows an image, you are done. If the display remains blank, continue using these steps.
- Replace the video cable.Turn on the display. If the display shows an image, you are done. If the display remains blank, continue using these steps.
- If the display does not work after replacing the cables, replace or service the display.
Reset and update the BIOS
You can use these steps even though you cannot see anything on the display.
In case an item was changed in the BIOS, such as the primary display device setting, use one of the following sections to reset the BIOS back to its default configuration:
- Turn on the computer and repeatedly press the F10 key for eight seconds.
- Press the Down arrow three times.
- Press the Enter key two times.
- Restart the computer.
If a BIOS update was not available or the display is still blank, continue to the next section.
Reseat loose internal components
Typically beep code is associated with the computer not recognizing a card, memory, or CPU. Memory, CPU, and video cables produce a beep code depending on BIOS POST type.
WARNING:
Edges of metal panels can be sharp. Use caution when handling.
CAUTION:
This product contains components that can be damaged by electrostatic discharge (ESD). To reduce the chance of ESD damage, work over a noncarpeted floor, use a static dissipative work surface (such as a conductive foam pad), and wear an ESD wrist strap connected to a grounded surface.
- Disconnect all cables. Write down each cable location so you can reconnect them in the future.
- With the power cable removed, press the Power button on the front of the computer for 5 seconds.
- Remove the screw(s) that secure the panel or cover to the rear of the computer.
NOTE:
Your case might not have screws as shown. It might have tabs or thumbscrews, or some other method of securing the panel or cover to the computer. See your user guide for specific instructions for your computer.
- Slide the side panel off from the rear of the computer.

- Gently press down on the outside edges of cards and memory modules that are inserted into the motherboard to better seat them. Do not press too hard.
- Gently press down on the connectors of the flat ribbon cables to seat them.
- Replace the side panel.
- Reconnect the computer cables.
- Turn on the computer.
If the display still shows a black screen, the video hardware might need to be replaced or serviced. If the display shows the first startup screen but does not display Windows, continue to the next section.
Change the display resolution
You cannot do this if you cannot view the first startup screen.
Use the following instructions to change to a compatible display resolution and color depth setting from a standard graphics mode. For flat panel LCD displays, set the display resolution to the display's native display resolution.
NOTE:
Connect the computer to a working display to perform these steps.
NOTE:
If you cannot select your display's native display resolution, then update the computer's video drivers and repeat this step.
- Turn on the computer and press the F8 key repeatedly when the first startup screen is displayed.
- The computer starts into Safe Mode. Increase the display resolution as follows:
Disable the power settings in BIOS
If Windows was recently upgraded, Windows might be starting up in a power saving state, and producing the blank screen before Windows loads. After Windows loads (about 2 minutes after turning on the computer), press the power button briefly or press the Suspend key on the keyboard to see if the computer comes out of the suspended state. If the computer opens in a suspended state every time the computer is started, use the following steps to disable Power Savings in the BIOS.
Connect the computer to a working display to perform these steps:
- Turn on the computer and repeatedly press F10. Press the key about once every second for 5 seconds after turning the computer on.
- In the BIOS Setup utility, press the right arrow key and select the Power tab.
- Press the down arrow key to select Hardware power Management.
- Press the right arrow key to disable SATA Power Management.
- Press F10 to save the settings and exit.
Replace the video card or have the hardware serviced
If you have tried all of the steps in this document and are still having the issue, the hardware is probably faulty.
If the display works on another computer and the computer has a video card, try replacing the video card on the computer. Refer to the hardware replacement documentation for your computer model.
If the display does not work on another computer, the display might be defective. The display should be replaced or serviced. Contact HP supportto find support if your display is in warranty or contact an authorized service center to assist you if your display is out of warranty
No comments:
Post a Comment