

Tuesday, July 10, 2018
Thursday, July 5, 2018
PC Randomly Rebooting?
PC randomly rebooting? Read this first...
As any regular visitor to Hardware Analysis or any of the other tech help forums can attest, one of the most common problems experienced by PC users is that of random reboots, often experienced when carrying out processor (CPU) or graphics processing (GPU) intensive tasks. These issues can be one of the most frustrating to track down and troubleshoot, but in actual fact most (although not all) of these problems can be attributed to one of only five causes:
1) Viruses and Spyware
2) Drivers
3) Overheating
4) Memory (RAM) problems
5) Power Supply (PSU) issues
The purpose of this is to provide a quick troubleshooting guide for anyone experiencing random reboots, hopefully to help the user track down the cause quickly and easily. Of course, there will always be exceptions to the rule and it may be the cause of your issue is not covered here, but please work through these troubleshooting steps before posting details of your particular problem.
Viruses and spyware
I've put this issue first, although viruses and spyware are among the least likely cause of system reboots. Writers of these types of programs generally want to leave the computer running so that it can carry out the intended task, so the reboots generally only result if the virus is badly written or you have multiple infections which are fighting for resources. Nonetheless, this is the easiest problem to troubleshoot, so I've put it first. Run a virus and spyware scan. If you have neither (why not?) use AVG, Avast! etc (insert name of your favourite virus scanner here), along with Adaware and Spybot Search and Destroy.
Drivers
Another one which is relatively unlikely to be the cause of the reboots, but can be ruled out quite easily. Run dxdiag, and have it check that your drivers are WHQL certified. Now, we all have devices which come with non MS certified drivers, but as a trouble shooting exercise, disable anything with a non WHQL driver and see how you go.
Overheating
CPU and GPU overheating can and will cause your PC to freeze up and crash. So first things first:
1. Check your temps, both CPU and GPU. Correct operating temperatures will vary, but a quick Google should tell you the temps your own setup should be running at.
2. Ensure all your fans are running, especially the heatsink fan and the GPU fan/s.
3. Take the side panel off of the case, and set up a desk fan to blow air into the case. If the problem goes away, you need to upgrade your cooling.
Ram problems
These can be a bit trickier, but generally:
1. If you have two or more RAM modules (DIMMs), remove all but one to see if this solves the rebooting. If not, swap them out, one stick at a time.
2. If your BIOS allows, increase the voltage to the ram by 0.1v.
PSU issues
Power supplies causing system instability is something which happens far more often that you might imagine. PSUs are subject to very high electrical loading, and today's power hungry components will inevitably wear down a cheap power supply. Unfortunately, it can be quite difficult to troubleshoot PSU issues without simply swapping it out with a good quality replacement. However, one way to do so is to unplug any unnecessary devices (optical drives, etc.) and see if the system stabilises.
Followed all the steps above and system is still rebooting? Congratulations-you've got a really unusual problem. Best get posting....
As any regular visitor to Hardware Analysis or any of the other tech help forums can attest, one of the most common problems experienced by PC users is that of random reboots, often experienced when carrying out processor (CPU) or graphics processing (GPU) intensive tasks. These issues can be one of the most frustrating to track down and troubleshoot, but in actual fact most (although not all) of these problems can be attributed to one of only five causes:
1) Viruses and Spyware
2) Drivers
3) Overheating
4) Memory (RAM) problems
5) Power Supply (PSU) issues
The purpose of this is to provide a quick troubleshooting guide for anyone experiencing random reboots, hopefully to help the user track down the cause quickly and easily. Of course, there will always be exceptions to the rule and it may be the cause of your issue is not covered here, but please work through these troubleshooting steps before posting details of your particular problem.
Viruses and spyware
I've put this issue first, although viruses and spyware are among the least likely cause of system reboots. Writers of these types of programs generally want to leave the computer running so that it can carry out the intended task, so the reboots generally only result if the virus is badly written or you have multiple infections which are fighting for resources. Nonetheless, this is the easiest problem to troubleshoot, so I've put it first. Run a virus and spyware scan. If you have neither (why not?) use AVG, Avast! etc (insert name of your favourite virus scanner here), along with Adaware and Spybot Search and Destroy.
Drivers
Another one which is relatively unlikely to be the cause of the reboots, but can be ruled out quite easily. Run dxdiag, and have it check that your drivers are WHQL certified. Now, we all have devices which come with non MS certified drivers, but as a trouble shooting exercise, disable anything with a non WHQL driver and see how you go.
Overheating
CPU and GPU overheating can and will cause your PC to freeze up and crash. So first things first:
1. Check your temps, both CPU and GPU. Correct operating temperatures will vary, but a quick Google should tell you the temps your own setup should be running at.
2. Ensure all your fans are running, especially the heatsink fan and the GPU fan/s.
3. Take the side panel off of the case, and set up a desk fan to blow air into the case. If the problem goes away, you need to upgrade your cooling.
Ram problems
These can be a bit trickier, but generally:
1. If you have two or more RAM modules (DIMMs), remove all but one to see if this solves the rebooting. If not, swap them out, one stick at a time.
2. If your BIOS allows, increase the voltage to the ram by 0.1v.
PSU issues
Power supplies causing system instability is something which happens far more often that you might imagine. PSUs are subject to very high electrical loading, and today's power hungry components will inevitably wear down a cheap power supply. Unfortunately, it can be quite difficult to troubleshoot PSU issues without simply swapping it out with a good quality replacement. However, one way to do so is to unplug any unnecessary devices (optical drives, etc.) and see if the system stabilises.
Followed all the steps above and system is still rebooting? Congratulations-you've got a really unusual problem. Best get posting....
Troubleshooting Display or Monitor is blank(black)after starting the computer...
HP Desktop PCs - Display or Monitor is Blank (Black) after Starting the Computer
A display is connected to the computer but does not display anything. Use the steps in this document to resolve this issue or to determine if the display is defective.
This document is describes how to troubleshoot a video connection from a display (or a TV being used as a display) to a personal computer. If you have a computer with a built-in display, such as an HP or Compaq All-in-One PC or HP TouchSmart PC, see Screen is Blank after Starting the Computer.
This document helps you determine if the blank or black screen is being caused by the computer hardware, the video signal to the display, or the display itself.
NOTE:
This document does not address issues encountered using HDMI cables and displays. For troubleshooting information for HDMI, seeTroubleshooting HDMI Display and Sound Issues.
Before you begin
Do the following things to prepare for troubleshooting:
- Turn off the computer.
- Disconnect all connected devices from the computer except the mouse, and keyboard. This includes removing web cameras, USB devices, thumb drives, camera-type memory cards, and other displays.
- If the display has a detachable cable, obtain a second display cable for testing purposes.
- Disconnect the display power cable, wait about 30 seconds, reconnect the cable and then turn on the display. This resets the electronics on the display. Make sure the display has power and the power light comes on when the power button is pressed. If the light on the display remains off, the display is not receiving power from either the wall outlet or the power adapter.
Check the power
Disconnect the video cable from the display and make sure the display power cable is plugged into a power outlet.
With the display plugged in, press the power button on the display. There is a power indicator light located on the display case. What happens to the light?
- If the power light comes on, the display has power, skip to Listen to the computer and look at the lights.
- If power light remains off when you press the power button, either the display is not receiving power or the display is defective. Check all of the following items before attempting to service or replace the display:
- Make sure the power outlet has power and the power outlet matches the power rating for the display.
- Connect the display to a different power outlet.
- Try a different power cord.
If the light comes on, the display has power. Continue to the next section.
Listen to the computer and look at the lights
To help determine if the problem is caused by the computer, turn on the computer and listen to it. Look at the computer's lights. What do you notice?
- If the computer is make a beeping sound when turned on, a card, cable, memory module, or processor inside the computer might be loose. Go to Reseat loose internal components to check for loose components.
- Do you hear the computer's fan spinning? If you do not hear noise from the fans and the power light on the computer are not on, the problem is related to the computer, not the display. To continue troubleshooting a computer that does not start, refer to HP Guided Solution - No Power or No Boot Troubleshooting.
- If you can hear the computer's fan spin and see lights on the computer, the problem is probably caused by the video cable connection or the display. Continue to the next section.
Reset the display
At first setup, or under certain signal conditions, the display might not be able to switch to a new display resolution. Do not shut down or restart the computer. Instead, perform the following steps:
You should see the image from the computer on the screen. If not, continue with the troubleshooting.
On-screen message shows on the display
Use the following steps to see if a built-in on-screen message is displayed.
- Connect the video cable and turn on the computer.
- Turn on the display and wait about ten seconds while the computer starts.
- While the computer is starting, disconnect the video cable. What happens?
- If a message is displayed, the display panel is working and the problem is related to the video signal. For further troubleshooting steps, see HP support document, Flat Panel Monitor Displays Message about No Signal, Signal out of Range, Sleep, or Power Save.
- If the display remains blank, turn off the computer and continue troubleshooting.
- Some displays do not have on-screen messages but instead use the lights to indicate no signal. When you disconnect the cable, instead of an on-screen message, the light turns amber, indicating that the display lost signal and is working properly, but is out of range, or not receiving the signal.
Inspect the video cable and video connectors for damage
Inspect the video cable and video connectors for damage. Check for sharp bends or breaks in the cable, or bent or broken pins at the connectors. Look for debris, dirt, crud, or other obstructions and clean the connections if needed.
Common connections used currently are DisplayPort and DVI.


Common connections used currently are DisplayPort and DVI.
Reconnect the display, making sure that the video cable is firmly connected and then turn on the computer and display. If the display is still blank, continue to the next section.
Do not remove the video port cover
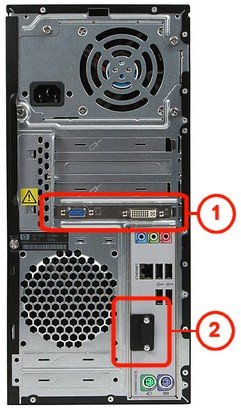
If your computer came with a graphics card, HP may have installed a plastic cover over the video port attached to the motherboard. This is because video has been set up to go through the graphics card for better performance. Most PCs can use graphics from the video card or the motherboard, but not both at the same time. If you remove the plastic cover to connect a display (VGA or HDMI), the video will not work unless the video card is removed. The better solution is to connect an adapter to make the connection.
- Video card with 1 VGA port and 1 DVI port
- Covered VGA port - should not be used
Check cable connections
If you see the initial HP or Compaq logo screen but later lose the picture, go to Connect the computer to another display.
Otherwise, check the video cable connection on the back of the computer and on the display. Make sure that it is connected properly and the connecting screws are tight. Turn the display off and then back on again (while the computer is on) to see if an image gets displayed.
Ensure that you have the display power adapter cord plugged into the power connector.
After you have reconnected the power cord, turn on the display (while the computer is on) to see if an image is displayed. If there is still no image, continue to the next section.
Connect the computer to another display
Connect another display to the computer to determine which device has the problem (the display or the computer). If you do not have an extra display, temporarily connect the computer to a friend's display for troubleshooting purposes.
After the display is connected, turn on the computer and the display. What happens?
- If the newly attached display does not display anything, disconnect the cable and refer to the support document HP Guided Solution - No Power or No Boot Troubleshooting.
- If the newly attached display shows the first startup screen(s) but then goes blank or black, there is a problem with Windows starting. See support document: HP Guided Solution - No Power or No Boot Troubleshooting
- If the new display works, the original display or its cables might be faulty. Complete the following instructions with the original, faulty display.
- Check the power light indicator.
- If it is amber, the display has adequate power, but is not receiving a display / video signal.
- If it is white or blue, the display is powering and receiving a display signal, but might indicate another problem with the display panel.
- If it is not amber, white, or blue, continue to the next step.
- Replace the display power cable.
- Turn on the display. If the display shows an image, you are done. If the display remains blank, continue using these steps.
- Replace the video cable.Turn on the display. If the display shows an image, you are done. If the display remains blank, continue using these steps.
- If the display does not work after replacing the cables, replace or service the display.
Reset and update the BIOS
You can use these steps even though you cannot see anything on the display.
In case an item was changed in the BIOS, such as the primary display device setting, use one of the following sections to reset the BIOS back to its default configuration:
- Turn on the computer and repeatedly press the F10 key for eight seconds.
- Press the Down arrow three times.
- Press the Enter key two times.
- Restart the computer.
If a BIOS update was not available or the display is still blank, continue to the next section.
Reseat loose internal components
Typically beep code is associated with the computer not recognizing a card, memory, or CPU. Memory, CPU, and video cables produce a beep code depending on BIOS POST type.
WARNING:
Edges of metal panels can be sharp. Use caution when handling.
CAUTION:
This product contains components that can be damaged by electrostatic discharge (ESD). To reduce the chance of ESD damage, work over a noncarpeted floor, use a static dissipative work surface (such as a conductive foam pad), and wear an ESD wrist strap connected to a grounded surface.
- Disconnect all cables. Write down each cable location so you can reconnect them in the future.
- With the power cable removed, press the Power button on the front of the computer for 5 seconds.
- Remove the screw(s) that secure the panel or cover to the rear of the computer.
NOTE:
Your case might not have screws as shown. It might have tabs or thumbscrews, or some other method of securing the panel or cover to the computer. See your user guide for specific instructions for your computer.
- Slide the side panel off from the rear of the computer.

- Gently press down on the outside edges of cards and memory modules that are inserted into the motherboard to better seat them. Do not press too hard.
- Gently press down on the connectors of the flat ribbon cables to seat them.
- Replace the side panel.
- Reconnect the computer cables.
- Turn on the computer.
If the display still shows a black screen, the video hardware might need to be replaced or serviced. If the display shows the first startup screen but does not display Windows, continue to the next section.
Change the display resolution
You cannot do this if you cannot view the first startup screen.
Use the following instructions to change to a compatible display resolution and color depth setting from a standard graphics mode. For flat panel LCD displays, set the display resolution to the display's native display resolution.
NOTE:
Connect the computer to a working display to perform these steps.
NOTE:
If you cannot select your display's native display resolution, then update the computer's video drivers and repeat this step.
- Turn on the computer and press the F8 key repeatedly when the first startup screen is displayed.
- The computer starts into Safe Mode. Increase the display resolution as follows:
Disable the power settings in BIOS
If Windows was recently upgraded, Windows might be starting up in a power saving state, and producing the blank screen before Windows loads. After Windows loads (about 2 minutes after turning on the computer), press the power button briefly or press the Suspend key on the keyboard to see if the computer comes out of the suspended state. If the computer opens in a suspended state every time the computer is started, use the following steps to disable Power Savings in the BIOS.
Connect the computer to a working display to perform these steps:
- Turn on the computer and repeatedly press F10. Press the key about once every second for 5 seconds after turning the computer on.
- In the BIOS Setup utility, press the right arrow key and select the Power tab.
- Press the down arrow key to select Hardware power Management.
- Press the right arrow key to disable SATA Power Management.
- Press F10 to save the settings and exit.
Replace the video card or have the hardware serviced
If you have tried all of the steps in this document and are still having the issue, the hardware is probably faulty.
If the display works on another computer and the computer has a video card, try replacing the video card on the computer. Refer to the hardware replacement documentation for your computer model.
If the display does not work on another computer, the display might be defective. The display should be replaced or serviced. Contact HP supportto find support if your display is in warranty or contact an authorized service center to assist you if your display is out of warranty
Monday, July 2, 2018
KEYBOARD SHORTCUTS
KEYBOARD SHORTCUTS
Press this key
|
To do this
|
|---|---|
F1
|
Display Help
|
Ctrl+C
|
Copy the selected item
|
Ctrl+X
|
Cut the selected item
|
Ctrl+V
|
Paste the selected item
|
Ctrl+Z
|
Undo an action
|
Ctrl+Y
|
Redo an action
|
Delete
|
Delete the selected item and move it to the Recycle Bin
|
Shift+Delete
|
Delete the selected item without moving it to the Recycle Bin first
|
F2
|
Rename the selected item
|
Ctrl+Right Arrow
|
Move the cursor to the beginning of the next word
|
Ctrl+Left Arrow
|
Move the cursor to the beginning of the previous word
|
Ctrl+Down Arrow
|
Move the cursor to the beginning of the next paragraph
|
Ctrl+Up Arrow
|
Move the cursor to the beginning of the previous paragraph
|
Ctrl+Shift with an arrow key
|
Select a block of text
|
Shift with any arrow key
|
Select more than one item in a window or on the desktop, or select text within a document
|
Ctrl with any arrow key+Spacebar
|
Select multiple individual items in a window or on the desktop
|
Ctrl+A
|
Select all items in a document or window
|
F3
|
Search for a file or folder
|
Alt+Enter
|
Display properties for the selected item
|
Alt+F4
|
Close the active item, or exit the active program
|
Alt+Spacebar
|
Open the shortcut menu for the active window
|
Ctrl+F4
|
Close the active document (in programs that allow you to have multiple documents open simultaneously)
|
Alt+Tab
|
Switch between open items
|
Ctrl+Alt+Tab
|
Use the arrow keys to switch between open items
|
Ctrl+Mouse scroll wheel
|
Change the size of icons on the desktop
|
Windows logo key
|
Cycle through programs on the taskbar by using Aero Flip 3-D
|
Ctrl+Windows logo key
|
Use the arrow keys to cycle through programs on the taskbar by using Aero Flip 3-D
|
Alt+Esc
|
Cycle through items in the order in which they were opened
|
F6
|
Cycle through screen elements in a window or on the desktop
|
F4
|
Display the address bar list in Windows Explorer
|
Shift+F10
|
Display the shortcut menu for the selected item
|
Ctrl+Esc
|
Open the Start menu
|
Alt+underlined letter
|
Display the corresponding menu
|
Alt+underlined letter
|
Perform the menu command (or other underlined command)
|
F10
|
Activate the menu bar in the active program
|
Right Arrow
|
Open the next menu to the right, or open a submenu
|
Left Arrow
|
Open the next menu to the left, or close a submenu
|
F5
|
Refresh the active window
|
Alt+Up Arrow
|
View the folder one level up in Windows Explorer
|
Esc
|
Cancel the current task
|
Ctrl+Shift+Esc
|
Open Task Manager
|
Shift when you insert a CD
|
Prevent the CD from automatically playing
|
2018 july 02 How to make pendrive bootable:>?
To create a bootable USB flash drive
- Insert a USB flash drive into a running computer.
- Open a Command Prompt window as an administrator.
- Type
diskpart. - In the new command line window that opens, to determine the USB flash drive number or drive letter, at the command prompt, type
list disk, and then click ENTER. Thelist diskcommand displays all the disks on the computer. Note the drive number or drive letter of the USB flash drive. - At the command prompt, type
select disk <X>, where X is the drive number or drive letter of the USB flash drive, and then click ENTER. - Type
clean, and the click ENTER. This command deletes all data from the USB flash drive. - To create a new primary partition on the USB flash drive, type
create part pri, and then click ENTER. - To select the partition that you just created, type
select part 1, and then click ENTER. - To format the partition, type
format fs=ntfs quick, and then click ENTER.ImportantIf your server platform supports Unified Extensible Firmware Interface (UEFI), you should format the USB flash drive as FAT32 rather than as NTFS. To format the partition as FAT32, typeformat fs=fat32 quick, and then click ENTER. - Type
active, and then click ENTER. - Type
exit, and then click ENTER. - When you finish preparing your custom image, save it to the root of the USB flash drive
Subscribe to:
Posts (Atom)
HOW PREPARE YOURSELF BEFORE AN INTERVIEW?
Research about the organization. Search background information, get the perspective, develop a question list. Compare your skills an...
-
Multiple Choice Marks = 1 Q. NO. 1 You have noticed on your network that users are having difficulty accessing Web pages. The pages se...
-
1.How to project your confidence in an interview? • Smile and trying to enjoy the process. • Maintain eye contact while entering,...