Thursday, September 20, 2018

HOW TO HACK WIFI PASSWORD USING KALI LINUX

How to Hack WPA/WPA2 Wi Fi with Kali Linux

This wikiHow teaches you how to find out the password for a WPA or WPA2 network by hacking it with Kali Linux.

Part1
Preparing to Hack Wi-Fi

  1. 1
    Understand when you can legally hack Wi-Fi. In most regions, the only time you can hack a WPA or WPA2 network is when the network either belongs to you or belongs to someone who has given you explicit consent to hack the network.
    • Hacking networks that don't meet the above criteria is illegal, and may constitute a federal crime.
  2. 2
    Download the Kali Linux disk image. Kali Linux is the preferred tool for hacking WPA and WPA2. You can download the Kali Linux installation image (ISO) by doing the following:
    • Go to https://www.kali.org/downloads/ in your computer's web browser.
    • Click HTTP next to the version of Kali you want to use.
    • Wait for the file to finish downloading.
  3. 3
    Attach a flash drive to your computer. You'll need to use a flash drive with at least 4 gigabytes of space for this process.
  4. 4
    Make your flash drive bootable. This is necessary in order to be able to use the USB flash drive as an installation location.
    • You can also use a Mac for this step.
  5. 5
    Place the Kali Linux ISO file on the flash drive. Open the flash drive, then drag the downloaded Kali Linux ISO file into the flash drive's window.
    • Make sure you leave your USB flash drive plugged in after you finish this process.
  6. 6
    Install Kali Linux. To install Kali Linux on your computer, do the following:
    • Prompt your Windows computer to restart.
    • Enter the BIOS menu.
    • Set your computer to start from your USB drive by finding the "Boot Options" (or similar) section, selecting your USB drive's name, and moving it to the top of the list.
    • Save and exit, then wait for the Kali Linux installation window to appear (you may have to restart your computer one more time).
    • Follow the Kali Linux installation prompts.
  7. 7
    Buy a Wi-Fi card that supports monitoring. You can find Wi-Fi cards online or in tech department stores. Make sure that your Wi-Fi card allows monitoring (RFMON), or you won't be able to hack a network.
    • Many computers have built-in RFMON Wi-Fi cards, so you might want to try the first four steps of the next part before buying one.
    • If you're using Kali Linux in a virtual machine, you will need a Wi-Fi card regardless of your computer's card.
  8. 8
    Log into your Kali Linux computer as root. Enter your root username and password when logging in.
    • You will need to be on your root account at all times during the hacking process.
  9. 9
    Plug your Wi-Fi card into your Kali Linux computer. Doing so will immediately prompt the card to begin setting up and downloading drivers for itself; if prompted, follow the on-screen instructions to complete the setup. Once you're done with this step, you can proceed with hacking your selected network.
    • If you've already set up the card on your computer before, you'll still have to set it up for Kali Linux here by plugging it in.
    • In most cases, simply attaching the card to your computer will be enough to set it up.

Part2
Hacking Wi-Fi

  1. 1
    Open your Kali Linux computer's Terminal. Find and click the Terminal app icon, which resembles a black box with a white ">_" on it.
    • You can also just press Alt+Ctrl+T to open the Terminal.
  2. 2
    Enter the Aircrack-ng installation command. Type in the following command, then press  Enter
    sudo apt-get install aircrack-ng
    
  3. 3
    Enter your password when prompted. Type in the password you use to log into your computer, then press  Enter. This enables root access for any other commands executed in Terminal.
    • If you open another Terminal window (as you may later in this article), you may have to run a command with the sudo prefix and/or enter your password again.
  4. 4
    Install Aircrack-ng. Press Y when prompted, then wait for the program to finish installing.
  5. 5
    Turn on airmon-ng. Type in the following command, then press  Enter
    airmon-ng
    
  6. 6
    Find the monitor name. You'll find this in the "Interface" column.
    • If you're hacking your own network, it will usually be named "wlan0".
    • If you don't see a monitor name, your Wi-Fi card doesn't support monitoring.
  7. 7
    Begin monitoring the network. You can do so by typing in the following command and pressing  Enter
    airmon-ng start wlan0
    
    • Make sure you replace "wlan0" with the name of your target network if it's different.
  8. 8
    Enable a monitor mode interface. Enter the following command: 
    iwconfig
    
  9. 9
    Kill any processes that return errors. In some cases, your Wi-Fi card will conflict with running services on your computer. You can kill these processes by entering the following command:[1]
    airmon-ng check kill
    
  10. 10
    Review the monitor interface name. In most cases, the name will be something like "mon0" or "wlan0mon".[2]
  11. 11
    Tell your computer to listen to nearby routers. To get a list of all routers in range, enter the following command: 
    airodump-ng mon0
    
    • Make sure you replace "mon0" with whatever your monitor interface name was in the last step.
  12. 12
    Find the router you want to hack. At the end of each string of text, you'll see a name; find the one belonging to the network you want to hack into.
  13. 13
    Make sure the router is using WPA or WPA2 security. If you see "WPA" or "WPA2" immediately to the left of the network's name, you can proceed; otherwise, you cannot hack the network.
  14. 14
    Note the MAC address and channel number of the router. These pieces of information are to the left of the network's name:
    • MAC address — This is the line of numbers on the far-left side of your router's line.
    • Channel — This is the number (e.g., 0, 1, 2, etc.) directly to the left of the WPA or WPA2 tag.
  15. 15
    Monitor your selected network for a handshake. A "handshake" occurs when an item connects to a network (e.g., when your computer connects to a router). Enter the following code, making sure to replace the necessary components of the command with your network's information: 
    airodump-ng -c channel --bssid MAC -w /root/Desktop mon0
    
    • Replace "channel" with the channel number you found in the last step.
    • Replace "MAC" with the MAC address you found in the last step.
    • Remember to replace "mon0" with whatever your interface name was.
    • Here's an example address: 
      airodump-ng -c 3 --bssid 1C:1C:1E:C1:AB:C1 -w /root/Desktop wlan0mon
      
  16. 16
    Wait for a handshake to appear. Once you see a line with the tag "WPA handshake:" followed by a MAC address in the upper-right corner of the screen, you can proceed.
  17. 17
    Exit airodump-ng, then open the desktop. Press Ctrl+C to quit, then make sure you can see the ".cap" file on your computer's desktop.
  18. 18
    Rename your ".cap" file. While not strictly necessary, this will make it easier to work with later. Enter the following command to change the name, making sure to replace "name" with whatever you want to name the file: 
    mv ./-01.cap name.cap
    
    • If your ".cap" file isn't named "-01.cap", replace "-01.cap" with whatever your ".cap" file's name is.
  19. 19
    Convert the ".cap" file into ".hccapx" format. You can do this by using Kali Linux's converter. Enter the following command, making sure to replace "name" with your file's name: 
    cap2hccapx.bin name.cap name.hccapx
    
    • You can also go to https://hashcat.net/cap2hccapx/ and upload the ".cap" file to the converter by clicking Choose File and selecting your file. Once the file is uploaded, click Convert to convert it and then download it back onto your desktop before proceeding.
  20. 20
    Install naive-hashcat. This is the service you'll use to crack the password. Enter the following commands in order: 
    sudo git clone https://github.com/brannondorsey/naive-hashcat
    cd naive-hashcat
    curl -L -o dicts/rockyou.txt https://github.com/brannondorsey/naive-hashcat/releases/download/data/rockyou.txt
    
  21. 21
    Run naive-hashcat. Once it finishes installing, enter the following command (making sure to replace any instance of "name" with your ".cap" file's name): 
    HASH_FILE=name.hccapx POT_FILE=name.pot HASH_TYPE=2500 ./naive-hashcat.sh
    
  22. 22
    Wait for the network password to be cracked. Once the password is cracked, its string will be added to the "name.pot" file found in the "naive-hashcat" directory; the word or phrase after the last colon in the string is the password.
    • It can take anywhere from a few hours to a few months for the password to be cracked.

Part3
Using Aircrack-Ng for Non-GPU Computers

  1. 1
    Download a dictionary file. The most commonly used dictionary file is "Rock You". You can download it by entering the following command: 
    curl -L -o rockyou.txt https://github.com/brannondorsey/naive-hashcat/releases/download/data/rockyou.txt
    
    • Keep in mind that aircrack-ng will not be able to crack the WPA or WPA2 password if the password isn't in the word list.
  2. 2
    Tell aircrack-ng to begin cracking the password. Enter the following command, making sure to use the necessary network information when doing so: 
    aircrack-ng -a2 -b MAC -w rockyou.txt name.cap
    
    • If you're cracking a WPA network instead of a WPA2 network, replace "-a2" with -a.
    • Replace "MAC" with the MAC address you found in the last section.
    • Replace "name" with your ".cap" file's name.
  3. 3
    Wait for Terminal to display the results. When you see a "KEY FOUND!" heading appear, aircrack-ng has found the password. You'll see the password displayed in brackets to the right of the "KEY FOUND!" heading.

Part4
Using Deauth Attacks to Force a Handshake

  1. 1
    Understand what a deauth attack does. Deauth attacks send malicious deauthentication packets to the router you're trying to break into, causing the Internet to disconnect and ask the Internet user to log back in. Once the user logs back in, you will be provided with a handshake.
  2. 2
    Monitor your network. Enter the following command, making sure to enter your network's information where necessary: 
    airodump-ng -c channel --bssid MAC
    
    • For example: 
      airodump-ng -c 1 --bssid 9C:5C:8E:C9:AB:C0
      
  3. 3
    Wait for something to connect to the network. Once you see two MAC addresses appear next to each other (and a string of text that includes a manufacturer name next to them), you can proceed.
    • This indicates that a client (e.g., a computer) is now connected to the network.
  4. 4
    Open a new Terminal window. You can just press Alt+Ctrl+T to do this. Make sure airodump-ng is still running in the background Terminal window.
  5. 5
    Send the deauth packets. Enter the following command, making sure to substitute your network's information:[3]
    aireplay-ng -0 2 -a MAC1 -c MAC2 mon0
    
    • The "2" refers to the number of packets to send. You can increase or decrease this number, but keep in mind that sending more than two packets can cause a noticeable security breach.
    • Replace "MAC1" with the left-most MAC address at the bottom of the background Terminal window.
    • Replace "MAC2" with the right-most MAC address at the bottom of the background Terminal window.
    • Remember to replace "mon0" with your interface name that you found when your computer initially looked for routers.
    • An example command looks like this: 
      aireplay-ng -0 3 -a 9C:5C:8E:C9:AB:C0 -c 64:BC:0C:48:97:F7 mon0
      
  6. 6
    Re-open the original Terminal window. Go back to the background Terminal window when you're done sending the deauth packets.
  7. 7
    Look for a handshake. Once you see the "WPA handshake:" tag and the address next to it, you can proceed with hacking your n

NETWORKING---CHANGING LAN SETTING IN OS

Networking---- Changing LAN setting in OS

HOW TO CHANGE LAN CARD SPEED,DUPLEX AND MAC ADDRESS


 Follow these steps to do this task.

>>Click start

 >>select control Panel
 >>Select Network and Sharing Center
 >> Select change adapter Settings
 >>Select LAN card which you want to configure
 >>Go to properties
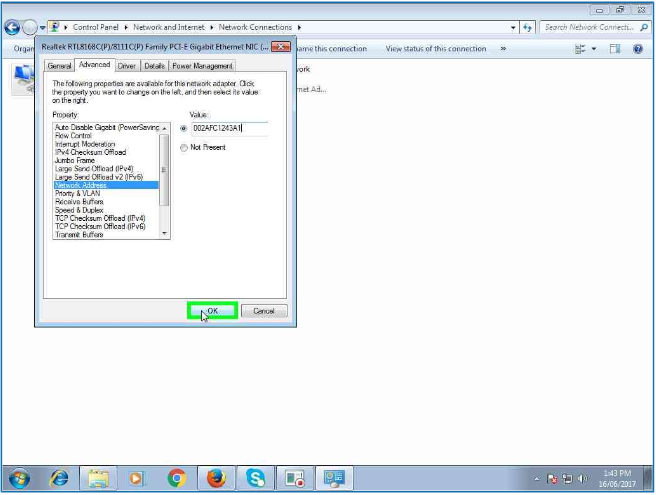
 >>Select Configure
 >> Select Advance
 >>Select Speed and Duplex to  change speed of NIC.
 >>Click on Auto negotiation   (this is default setting)
 >>You can select as per your requirement . There are many options .(10mbps/100mbps/1gbps)
 >>Select Network Address to change MAC address
 >>clear all zero and write here 12 hexadecimal digits

 >>OK


NETWORKING PROTOCOLS AND THEIR FUNCTIONS.

Networking-- Protocols and their functions.

SOME IMPORTANT PROTOCOL AND THEIR WORK


  •  ICMP (Internet Control message Protocol) - For connection      troubleshooting.


  • ARP (Address Resolution Protocol) Used to resolve IP to MAC address.


  • RARP( Reverse Address Resolution Protocol) Used to resolve MAC to IP.


  • DHCP( Dynamic Host Configuration Protocol ) Used to provide automatic IP address


  • HTTP (Hyper Text Transfer Protocol ) Used to access web pages from browsers.


  • SMB ( Service Message Block ) Used to share resources for windows PCs.


  • NFS ( Network File System ) Used to share resources between windows and Unix OS.


  • IGMP (Internet Group Message Protocol ) Used to send messages to multiple hosts .


  • SMTP ( Simple Mail Transfer Protocol ) Used to send email.


  • POP ( Post Office Protocol ) Used to receive mail


  • IMAP ( Internet Message Access Protocol ) Used to receive mail.


  • NNTP ( Network News Transfer Protocol ) Used to send news to a group 


  • NTP( Network Time Protocol ) Used to update time of all network devices.


  • FTP ( File Transfer Protocol ) Used to download and upload files in intranet or internet.


  • TFTP ( Trivial File Transfer Protocol ) Used to download and upload files but less secure than  FTP


  • RDP ( Remote Desktop Protocol ) Used to access remote desktop


  • TCP ( Transmission Control Protocol ) Used to deliver data from one device to another .


  • UDP ( User Data gram protocol ) Used to deliver data but it is connection less


  •  RIP ( Routing Information Protocol ) Used for Dynamic Routing.


  • OSPF ( Open Shortest Path First ) Used for Dynamic Routing.


  • BGP ( Border Gateway Protocol ) Used for Routing between two AS.


  • IS-IS ( Intermediate System to Intermediate System) Use for routing.


  • PPTP ( Point to Point Tunneling Protocol ) Used for tunneling in VPN.


  • L2TP ( Layer 2 Tunneling Protocol ) Used for tunneling.


  • SSTP ( Secure Socket Tunneling Protocol ) Used for tunneling


  • CHAP ( Challenged Handshake Authentication Protocol ) Used for authentication.


  • PPP ( Point to Point Protocol ) Used for frmaing.


  • STP (Spanning Tree Protocol ) Used to prevent loop in switches.


  • VTP (Virtual Trunking Protocol ) Used for trunking in switches. 


LINUX COMMAND

Linux Command

How to give permissions in Linux-


In Linux, When we create any file or directory .A user who creates directory has owner permission and can give permissions to user group and others(all). Permissions are applied to UGO ( user, group and Others)
.There are three permissions - Read , Write and Execute-

Which user has Read,Write and Execute can do all changes which is similar to full control of windows.

chmod command is used to give permissions-


Octal numbers are used to assign permissions-

0 - no permission ( Deny )
1- Execute
2- Write
3- Write+Execute
4- Read
5-Read+Execute
6- Read+ Write
7- Read+ Write+ Execute

You can write chmod command for full control like this.

#chmod 777 yash

where -first 7 is for user , second 7 is for Group and Third 7 is for Others.
             7 represents full control ( read+write+execute)


You can remove permissions-

#chmod 000 yash

where 0 is for no permission

NETWORKING

Networking

TRANSMISSION MEDIA


There are two type of transmisson media-

1- Guided media (Cable)
2- Unguided media (wireless)

Guided Media-   Guided media is a type of data transmission medium which is guided by administrator. Administrator decides a way for data transmission. Where we need to install PC we can install cable for this.

Three types of cables are used for networking-

1-  Coaxial Cable
2- Twisted Pair Cable
3- Fiber Optic Cable

Coaxial Cable- It is a copper cable which works on half duplex . It is used in linear bus topology for                                networking.It can transfer data one PCs data at a time. Now days it used for distributing TV cable connection. There is only one way of data transmission. Service providers broadcast signals and TV receiver receives signal.Coaxial cable uses BNC connector such as BNC terminator, BNC Cable connector, BNC T type connector.

It is two type -

Thick coaxial (Thicknet/RG8)-   It is a type of coaxial cable which is used as a backbone cable in Bus topology.


Speed                               = 10mbps

Duplex                             = Half

Segment length                = 500 miter

Interferance                      = More secure transmission. It is shielded by PVC and mesh.

Crosstalk                           = Less chances of cross talk because it is shielded.


Thin Coaxial Cable (Thinnet/RG58)-  It is thinner than thick net . It is easy to install.


Speed                                =10 mbps

Duplex                              =Half

Segment lengh                  = 200 miter ( practicaly 185 miter)


Twisted Pair Cable-- 

It is most commonly used LAN cable . It is a type of cable which consist of  8 cylindrical wires. It is two type -

1-   UTP ( Unshielded Twisted Pair)  Cable- 

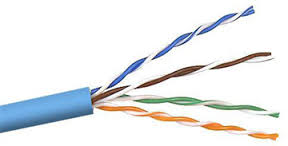
This types of cables don't  have shielding like STP cables. These cables have 8 wires covered with PVC and Outer jacket. These are widely used in LAN network because of some features-

1- Easy to install
2-Cheaper than other cables
3- Better speed
4- Good for full duplex star network


2-   STP ( Shielded Twisted Pair ) Cable 

These type of cables are same as UTP but they have shielding to protect from EMI, RFI and cross talk. They also have 8 wire and uses RJ45 connector. These are used where electrical noise is more.


Fiber Optic Cable- 


As name suggests it is made up of fiber and it's core is made up of soft glass. It uses laser or led for data transmission that is why it is known as optical cable. It provides best transmission speed and protection from internal or external interference (EMI, RFI and cross talk) . It is also unaffected by environmental issues. This type of cable is generally used for long distance because this can transmit data to a long distance without attenuation.

It is two type-

1- Single Mode Fiber
2-Multi mode  Fiber

1- Single Mode Fiber-  This type of cable is used for long distance. It uses laser for light source and can transmit one signal at a time. It uses uses always two cable , one for transmit and an other for receive.


Multi mode Fiber optic cable-  Multi mode fibers are used for short length . These type of cables can transmit multiple signal simultaneously . They use led for light source. These are used in a LAN where are more chances of interference . Because they protect from interference. They also use two cable, one for transmission and an other for receiving. 
 
You can not identify difference  between SMF and MMF by seeing cables. You need to read on cable or packet. because both use these connectors-

SC- Subscriber connector
ST- Straight tip
SMA- Sub miniature


OSI MODEL

Q1- What is OSI layer ?
Ans- OSI layer is a conceptual model developed by ISO which describes the flow of data between sender and receiver in a network. It describes the changing in data unit on each layer. There are seven layer in OSI model . All layer perform a specific task.

Q2- Tell me three network layer Protocols ?
Ans-  IP (internet Protocol)
         ARP ( Address Resolution Protocol )
         RARP ( Reverse Address Resolution Protocol )

Q3-  What is different between TCP and UDP ?
Ans- TCP and UDP both protocol works on Transport layer of OSI model. Both are responsible for               data delivery but there are some difference between them.

     TCP - 
It is a connection oriented protocol . It is a reliable protocol which gives acknowledgement after delivery a data to destination. It transfers data after making connection between source and destination computers. It is slower than UDP because it checks connection before sending any segment of data. HTTP, FTP, SMTP, RDP are works with TCP

   UDP- 
UDP is connection less protocol . It is unreliable because it does not give acknowledgement after delivering data. It is faster than TCP .  TFTP, DNS and DHCP works with UDP.

Q4- Which layer adds header and trailer ?
Ans- Data Link Layer.

Q5- Hub, switch, router, bridge, repeater , NIC , MAC , IP  works on which layer of OSI model.

Ans.  HUB           -         Physical Layer
          Switch        -         Data Link Layer
          Repeater     -         Physical Layer
          Bridge        -         Date Link Layer
          Router        -         Network Layer
          NIC            -         Data Link Layer
           MAC         -         Data Link Layer
           IP              -         Network Layer


Q6- Which layer is responsible for framing ?
Ans. Data link layer is responsible for framing. HDLC, PPP  and frame-relay are the data link layer protocol.

Q7- What is Port number ? Which layer adds port number ?

Ans- Port number is the address of protocol which is used to identify services working of any host in network. It is assigned by IANA ( Internet Assign Network Authority ) . Transport Layer adds port numbers in segment that is called service point addressing. There are some important protocol and their Port numbers.

HTTP ( Hyper Text Transfer Protocol )  -      80 (SSL-443)
SMTP ( Simple Mail Transfer Protocol ) - 25  (SSL-465)
POP  ( Post Office Protocol )                    -110  (SSL-995)
FTP  ( File Transfer Protocol )                  - 20 and 21
Telnet                                                         -23
RDP ( Remote Desktop Protocol )             -3389
ICMP ( Internet Control Message Protocol ) - 1 and 7

CCNA IP ADDRESS

CCNA- IP address

IP ADDRESS..............


IP address is a logical address which is assigned to networking devices for their identity. Using IP address we access resources from one device to another device.

There are two version of IP address.


1--IP version 4
2--IP version 6

IP VERSION 4--


                    It is a 32 bit logical address written in dotted decimal. It is used to identify devices in a network . It has   two part network ID and Host ID . Network ID indicates an unique ID for network and Host ID indicates device ID in network.


There are five classes in IPv4 according to size of network and purpose.


Class A- 1.0.0.0   - 126.255.255.255


  • In A class IP, 8bit is for NID and 24 bit for Host ID.
  • Default Subnet mask for this is 255.0.0.0
  • Total Subnet in A Class IP is 27-2=126
  • Host per Subnet  =  224-2 = 16777214
  • Private IP - 10.0.0.0-10.255.255.255


Class B- 128.0.0.0 - 191.255.255.255


  • In B class IP 16bit for NID and 16 bit for Host ID. 
  • Default Subnet mask for this is 255.255.0.0
  • Total Subnet in B Class IP is 214 -2=16382 
  • Host per Subnet = 216 -2=65534 
  • Private IP - 172.16.0.0 - 172.31.255.255

Class C- 192.0.0.0 to 223.255.255.255


  •  In C class IP 24bit is for NID and 8 bit for Host ID .
  •  Default Subnet mask is 255.255.255.0
  • Total Subnet in C class IP is 221 -2=   2097152
  •  Host per Subnet = 28-2=254
  •  Private IP - 192.168.0.0- 192.168.255.255

Class D- 224.0.0.0- 239.255.255.255

   D class is reserved for multicasting

Class E- 240.0.0.0 - 255.255.255.255

     E class is reserved for research


Special IP addresses...


APIPA (Automatic Private Internet Protocol Address ) -----
 It is assigned to devices Automatically when no DHCP server is active in network and static IP  address has not been configured too. APIPA ranges from 169.254.0.0 to 169.254.255.255.


Loopback Address- Loopback address is for Loopback test of devices.   Reserved address is   127.0.0.1

Default Broadcast Address- 255.255.255.255

Private IP - 


        Private IP address is free to use. We can use this IP without any permission of ISP. Private can only be routed in private Network . We can share and access resources in private network only.We can connect our private computer to public network using a router or Server . We will have to configure NAT on Server or Router.


There are two type of IP addresses are used.


1- Class full address-   When we use default subnet mask with IP address , This is known as Class full address. Class A, Class B and Class C addresses are class full addresses.

2- Class less addresses- When we use subnetted Address and new subnet mask . We do not follow Class .  This is known as Class less addresses.

Follow this table to know block size and subnet mask.


16777216ou can search for any mathematical expression, using functions such as: sin, cos, sqrt, etc. You can find a complete list of functions here.

CCNA-- IPv6

IP VERSION 6


IP version 6 is 128 bit logical address written in Hexadecimal . It has large number of IP address range which will help to overcome problems due to unavailability of IP version 4. We were using NAT to use private IP in public network. If we use IPv6. We don;t need to configure NAT. We don't need of sub netting  because IP v6 support any cast place of broadcast.

ex.   2000:0000:0abc:0124:ec12:1240:4124:1234   /64

 In given example 32 digit is used which is in hexadecimal. A group of 4 digit is known as chunk which is equal to 16 bit.   (f=15, where 15 is equal to (1111) 4 digit of binary ). Total 8 chunk is available in IPv6 . Then 16*8= 128bit.

In given example starting 48 bit is a global ID which is reserved . No one can change 48 bit. bit number 49 to 64 is Network ID. When we need to change NID ID we change it from 4th chunk.
Last 64 bit is for Host ID which will be unique for all networking devices. It uses 64 bit for host ID and 64 bit for NID .So we write /64 as a sub net prefix in place of sub net mask.

IP distributions.

     For example ..............


HOW PREPARE YOURSELF BEFORE AN INTERVIEW?

Research about the organization. Search background information, get the perspective, develop a question list. Compare your skills an...